In this article, we’ll show you exactly how to add an image in WordPress, step by step. You’ll learn how to select the image upload option, adjust image settings, add alt text for accessibility, and position the image on your page.
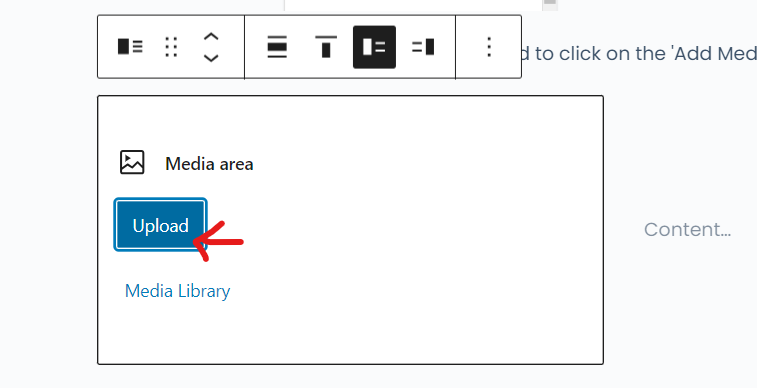
1. Selecting the Image Upload Option
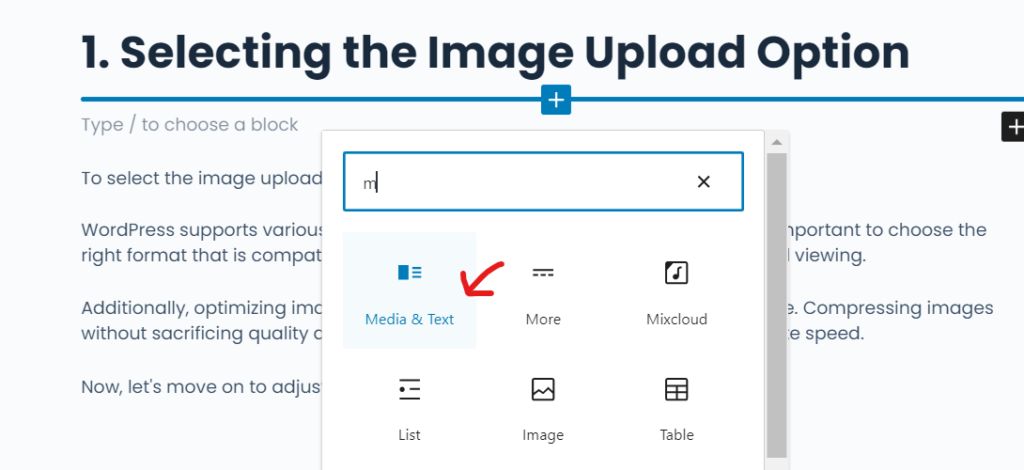
To select the image upload option, you’ll need to click on the ‘Add Media’ button.
WordPress supports various image file formats such as JPEG, PNG, and GIF. It’s important to choose the right format that is compatible with WordPress to ensure smooth uploading and viewing.
Additionally, optimizing image size and resolution is crucial for web performance. Compressing images without sacrificing quality and using the appropriate dimensions will improve site speed.
Now, let’s move on to adjusting image settings.
2. Adjusting Image Settings
You can easily modify the settings of the image in WordPress to suit your preferences. When adding an image, you have the option to adjust its dimensions to fit your desired layout. This allows you to control how the image appears on your website.
Additionally, you can add image captions to provide context or additional information about the image. Once you have adjusted the image settings, you can proceed to adding alt text to the image, which helps improve accessibility and SEO.
3. Adding Alt Text to the Image
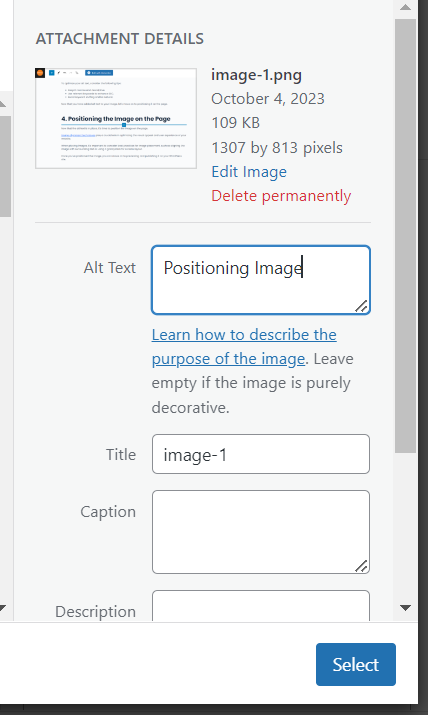
When modifying the settings of the image, don’t forget to include alt text for improved accessibility and SEO. Alt text, or alternative text, plays a crucial role in making your images accessible to individuals with visual impairments. Moreover, it also helps search engines understand the content and context of your images, improving your website’s SEO.
To optimize your alt text, consider the following tips:
- Keep it concise and descriptive.
- Use relevant keywords to enhance SEO.
- Avoid keyword stuffing and be natural.
4. Positioning the Image in WordPress Page
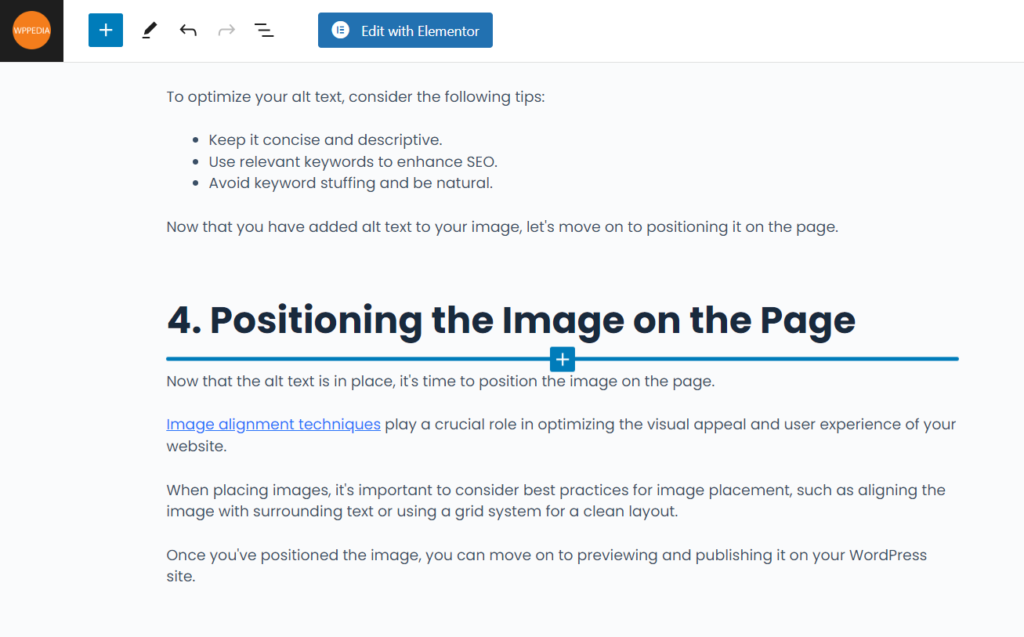
Now that the alt text is in place, it’s time to position the image on the page.
Image alignment techniques play a crucial role in optimizing the visual appeal and user experience of your website.
When placing images, it’s important to consider best practices for image placement, such as aligning the image with surrounding text or using a grid system for a clean layout.
Once you’ve positioned the image, you can move on to previewing and publishing it on your WordPress site.
5. Previewing and Publishing the Image
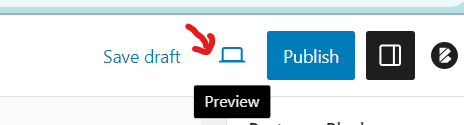
To preview and publish the image, simply click on the ‘Preview’ button and then choose the ‘Publish’ option.
When it comes to image file formats and their compatibility with WordPress, it’s important to choose the right format. WordPress supports popular formats like JPEG, PNG, and GIF.
Optimizing images is crucial for faster website loading speed. Compressing images, reducing their file size without compromising quality, can significantly improve your website’s performance.
6. Frequently Asked Questions
Q. Can I Add Multiple Images at Once Using the Image Upload Option in WordPress?
You can add multiple images at once using the image upload option in WordPress. This is a convenient way to organize your image files. Remember to add alt text to each image for accessibility purposes.
Q. How Do I Resize or Crop an Image After Uploading It in WordPress?
To resize or crop an image after uploading it in WordPress, go to the Media Library, select the image and click on Edit Image. From there, you can adjust the dimensions and crop as needed. Remember to add alt text and optimize images for SEO.
Q. Is There a Limit to the File Size or Dimensions of the Image I Can Upload in WordPress?
To optimize images for better performance in WordPress, it’s important to choose the best file formats, such as JPEG or PNG. Additionally, you can reduce file size by using compression tools or plugins.
Q. Can I Add a Caption or Description to the Image in WordPress?
Yes, you can add a caption or description to your image in WordPress. Captioning images in WordPress is important for accessibility and SEO. Adding alt text to your images helps search engines understand the content of your image.
Q. Does WordPress Automatically Optimize the Images for Web Use to Improve Page Loading Speed?
To optimize images for web use in WordPress, follow these best practices:
1) Resize and compress images without losing quality.
2) Use descriptive file names and alt tags. Image optimization improves page loading speed, SEO, and page ranking.
7. Conclusion
Now that you’ve learned how to add an image in WordPress, you have the power to bring your website to life. By selecting the image upload option and adjusting the settings to suit your needs, you can create a visually stunning experience for your readers.
Don’t forget to add alt text to your images for accessibility and improve your website’s SEO. With the ability to position the image on the page and preview it before publishing, you have complete control over the visual aesthetics of your website.
So go ahead, let your creativity soar and captivate your audience with captivating images.